Thursday, June 14, 2012

Dinner with Friendlings!


There is never an excuse to just host a dinner party on a Tuesday eve and invite those you love!
It was a great eve of laughter,food,wine and most wonderful company!


Mwaaashims, One Love!


The Feast

Moussaka,Squash,Pot Bread,Cream Spinach,Roast potatoes,Butternut,Hongkong Chicken


 My First attempt at Moussaka 
It was the bomb, if I may toot my own horn

 
Desert 
Peanut butter,chock chip cookies and Choc squares 


The friendlings!


Credits To: Tk  for the spinach and butternut 
                  Taryn for the Hongkong chicken
                 Everybody who got the wine selection right!
                   

Tuesday, June 12, 2012

Being Grateful!


Tonight I hosted a dinner for my friends , (just inje) like Karen would always say.
I was busy cooking away , when my one friend quietly came to me and said "Lynne I have something to tell you"

 "Lynne I just want to say thank you for being you and always remaining the same and never changing even through the bad"

I am so Grateful to all of you, who have become my family here in Cape Town. If it was not for you the good times would not be so discombobulated and the bad times would not have flown by so quickly!

Thank you Marquin!

Here are some of my favorite crazy moments! I'm so grateful to have shared with you all!!

 
Birds of a feather flock together
Discombobulating
Always Loud
Innovative
Styling

The Cheese
Sisters
That is how we roll
Therapist

Sunday, June 10, 2012

My New Toy


I invited friends for dinner next week and wanted to test out a new cookie recipe, I am planning to serve as desert. So off to the shops I go to get ingredients.

"Tra La La La, singing to mall music" then i saw it. My new toy! A voice came from above and said "Lynne imagine, no more whipping cream with a fork, no more mixing cake with a wooden spoon"  
I starting seeing visions of all the things i could do with it. There was no way of escaping,
I just had to have it!!

This is my remix and I'm sticking to it!


My first creation,using my new toy.

Peanut butter choc chip short bread cookie!

Thank you friendly, friend for sharing the recipe.These are so evil,but so very yummy!


Wednesday, May 16, 2012

"Splash Board"


Yay my new project is done! It looks so stunning and only cost me R290.00


A "Splash Board"  is a cool, affordable and classy way to fix up a kitchen counter if you are renting!
It was so easy to do.Baking a chocolate cake is more difficult!!


Fun part! DIY like me...


Products and Tools 


Step 1. Lay the tiles out on the board to see how many you would need to cover the surface.Then apply the tile adhesive, and stick the tiles down. (I used skewers to separate and align the tiles)


Step 2. After three days start Grouting (ladies its like icing a cake)
            It takes two days for the grout to dry.


I finished off with a mosaic border,because the tiles were too big, and I didn't have a tile cutter. All i did was smash a few tiles with a rock and just made a pretty pattern.


mosaic border


Another DIY bites the dust and it looks beautiful!

There is always this humbling and tiny sadness, when I finish up a project. I will look back at it and go "Wow" did I do that!

My plan is to frame my make shift kitchen counter, when i move into my home one day! I will place a tag on it that says "lynne this is where you began"


Oi !Im running out of things to do..  Oh Ps: My cream carpet is finally clean. Please give me clap handies !!! FYI dont ever get a cream carpet!! Dont ever,ever !


Monday, April 23, 2012

"DIY" Like Me !!! Beauty Treatments - 1 of 3


 I have alwayse been sceptical of "DIY" beauty treatments,but it   has been a very, very long time since I pampered myself and being mid month I was looking for affordable treatments to help me feel pretty and human again.

So i squized online and found masses of treatments,using ingredients most of  which can be found in your kitchen/bathroom cupboard.


Below are some of the funny treatments I tried and was really surprised by the results.


Treatment One -  Black head exfoliator

Ingredients - Tooth paste and Salt

  •  One tea spoon of salt and a half tea spoon of tooth paste.
  •  Mix together till pasty and then apply to your nose.
  •  leave it on for 5min, then gently start to massage
  •  Wash off with warm water.


This really works I was abit sceptical, but i will most definitely do this once a week.
The skin on my nose was so soft ,I couldn't stop touching it. "Impressive"

The tooth paste opens and cleans your pores,while the salt not only acts as an exfoliator but also a disinfectant.


Treatment Two - Turmeric (Borrie) Face Mask.

Ingredients - Honey, Lemon and Turmeric (borrie) powder

 Apparently this has been an Indian treatment for many years.
" Common use by Indian brides, it was applied the night before they get married to have glowing skin on there wedding day"

  • In a bowl mix together a tea spoon of honey,turmeric and a squirt of lemon juice.
  • Once all have been mixed well apply on your face.( Make sure not  to get any in your eyes and nose)
  • leave on your face for 5 min and wash off with warm water.

This treatment is meant to help clear your face and take away dark marks,even complexion, less acne redness and swelling, and softening the appearance of wrinkles (used twice a week, it could diminish those wrinkles even more).

My friend gave me the recipe for this one, but there are many variations. Surprisingly the turmeric (borrie) powder does not stain your face!!!
Please don't mind the smell,suffer for beauty!!!


Treatment Three - Sugar Scrub

Ingredients - Sugar and Olive Oil


  • Table Spoon of White sugar and a Table spoon of Olive oil
  • Mix Ingredients together and this can be used as a hand, feet and body scrub

-Substitute the sugar and use salt.
-Substitute the olive oil and use either rose oil or lavender oil to give it a better fragrance.

This is fantastic!!! My hands feel wonderful, please please try this!!!


For the next three weeks I will document the "Turmeric Treatment" I would like to see if it will truly help clear my skin, especially my dark marks.
So expect more DIY organic treatment to try out. Exciting stuff!!


Our ancestors have been using natural & organic treatments for ages.Just because it cant be patented and marketed does not mean that it wont work.


One last tip to apply before bed!!!
( Vaseline can be used to help moisturise and grow, your eyelashes and eyebrows.
 Warm a small amount between your finger tips and massage into eyelashes and spread into eyebrows or apply to your feet,then go to sleep with socks on and wake up to soft feet
)

Monday, March 12, 2012

Fixer upper part 2


I cant believe the finished product!! And so very proud of me!!!

After a long two weeks, I finally give you....


Fixer Upper Part 2!!


The next step was to work on the frames and draws .
Once they were sanded and varnished (which took 4 days in total ) I then put the table together and ironed on the edging (img 3).


TADA!!! I give you my Master Piece!!


This project has shown me, that with all the right tools I can accomplish anything!!


Saturday, February 25, 2012

Fixer upper part 1


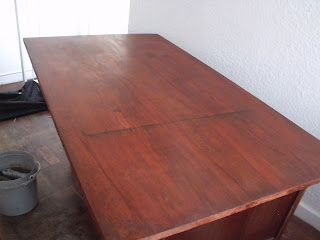
So I'm setting up a home office and desperately wanted an affordable desk!!!

I have always been known, to be impulsive!!! And this morning I woke up tapped into my Crazy and decided to purchase a fixer upper.

When the desk arrived, below was the look I would have wanted on my face...


Instead I politely smiled and asked "is this the desk ?"

So after a very long leisurely lunch, i decided to put on my big girl panties and proceeded to take on my mammoth task... "Eish Lynne Ne"

The Mammoth!!


DIY Like Me !!!


The products I used.


Step 1. I started by cleaning the table and with the scraper I took off the old edging.


Step 2. Sanded the desk "oi va voi"


Step3. Turned the desk over and removed the rotted plywood,
sanded the surface roughly and applied a sealer.


Step 4. Brushed turpentine over the top to remove the excess varnish.
After 5 min , I cleaned the turpentine and applied the stainer. (cherry wood)


Step 5. Once the stainer dried , i applied the first coat of varnish.


To be continued .......

Tuesday, January 10, 2012

My Vision


Yes it is that time of year, when New Years resolutions have been made.

This year I decided to squash the long list and create a vision board. The idea behind this is, to visualise and surround yourself with images of whom you want to become, or what you would like to achieve, a vision board allows you to tell a story and create a map for yourself.

It can help you apply the Law of Attraction and manifest the life you truly desire and deserve. I stuck my board up on a wall across my bed, so each night when I go to bed, it is the last thing I see and each morning it is in my face when I wake up.

How to make a vision board.

There are many themes and creative methods one can incorporate to making a board. I’m going to take you through steps for making a basic board.

Step One: Think about what your goals are or what do you envision for yourself that you would like to achieve, this yr or maybe in the next five yrs.

Step Two: Go through old magazines and find words or pictures that emulate your goals or what you envision.

E.g.; Eating Healthier – A pic of healthy fruits and veg.

Step Three: Map out all your pics, you can put little notes or affirmations next to it.

Step Four: Paste your pics and notes on a card board and hang where you are able to see it every day!!!!